

Saturday, June 30, 2012


Friday, June 29, 2012
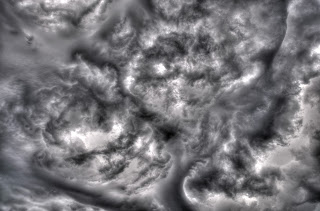
Skies On The Brew
These clouds are like your 14 year old daughter! She displays tons of anger ... but yields very little in substance! In this case, no rain fell to the ground with these rebellious looking clouds. It also looks like these nasties applied their make-up with a shotgun! I can say anything I want now. I'm a grandpa!
NikonSniper Steve


NikonSniper Steve


Thursday, June 28, 2012


Wednesday, June 27, 2012


Tuesday, June 26, 2012


Monday, June 25, 2012
High Dynamic Range Photography Made Simple
Have
you ever wanted to explore new photographic effects to make your photos more
interesting at a reasonable cost? If so, make sure you put HDR Photography with
the use of Photomatix Pro software on your investigation list. HDR stands for
High Dynamic Range and this photographic process creates images with incredible
detail and impossible clarity. Learning this relatively easy process with
Photomatix Pro software will guarantee to impress your viewers and they will
want to know exactly how you did it.

Typical Photograph – 1 Photo

HDR Photo created using
Photomatix Pro- 3 Photos
There
are two processes that need to be successfully navigated in order to get excellent
HDR images. The first process to master is how to collect the 3 required images
for the Photomatix Pro software. The second process is loading and using the Photomatix
Pro software for photo manipulation. These two processes will allow you to quickly
and simply adjust ordinary photographs and create surreal works of art in just minutes.
Let’s look at the secret to adding a little panache to your photos by learning
how to collect the 3 required images.
High
Dynamic Range photos are produced by merging three or more photos taken from different
exposure values. Typically, HDR results are achieved by combining an
under-exposed (too dark), a normally-exposed (just right) and an over-exposed
(too bright) version of the same photograph into one image with the use of a
software program. Not all software programs produce the desired effect so before
investing cash in any program you should learn to collect the photos and test
the software to see if you get the desired results.
In
most cases today, digital SLR cameras (expensive camera versions with detachable
lenses) have been supplied with a feature called Automatic Exposure Bracketing (AEB). The AEB feature enables your camera
to automatically alter the exposure for every shot in a series without you taking
time to change settings in-between shots. With this feature, you will be able
to depress your camera trigger for three consecutive shots that will produce
the -2EV (too dark), 0EV (just right), and +2EV (too bright) photos. The EV
stands for the exposure value. Look in your manual for how to setup your Automatic
Exposure Bracketing on your camera and learn the instructions to produce the
-2EV, 0EV and +2EV photos with this feature. Every camera brand has a slightly
different way to enable these features but your manual will make this very
simple and a complete novice can master this skill in minutes with the
instructions in the manual. You will only need to learn how to do this once so
the effort to figure this out is worth it.
After
learning how to capture these three images, plan a test day by choosing a day
that will offer some variations in weather. For the best results, choose a
bright day with clouds present for your shots. Bright days will yield a very
significant variation in the three exposure levels and maximize the range of variation
when you use the program to merge the photos later. Clouds often add moods that
cannot be achieved any other way. Photos with bright clear skies are nice but
lack the same moods and feelings presented with cloud variations. Clear skies never
seem to have the punch as photos with approaching storm fronts or puffy soft
white clouds. Take your camera with you at all times but especially when it’s a
cloudy day!
Now,
it’s time to head to the field to put this new found knowledge into practice.
Go somewhere that you like to photograph. Let’s turn this exploration into HDR
into something special! You will love the results produced with Photomatix Pro
for almost any perspective from placid country landscapes or even the hard
lines of a city landscape filled with architectural creativity. Chicagoland is
a photographic gold mine for HDR subject choices. Use your imagination or look
at the results others have produced with their settings and seek similar
situations for your test run.
When
your photo test day arrives, gather up your camera, a tripod and your manual. Keep
your manual with you until you have thoroughly learned the section on the Automatic
Exposure Bracketing. Then head to your photographic destination for your first
experience in collecting the three photos required to produce a great HDR
image.
At
your destination, set up your camera on a tripod after deciding on the best
available photo landscape. Spend some time getting the composition of the shot
positioned in an eye appealing way. Take some practice shots and see which ones
give you the best feeling of what you want to see in the final results. In
other words, position the lens so that the objects in the photo are right where
you want them in your final product. This is important because when you decide
on this position you will want to capture all three exposure variations from
this exact shot.
Next,
capture the -2EV, 0EV and +2EV variations of your photo. When you are satisfied
that you have captured your photograph in these three required exposure values,
you may wish to repeat this process several times as lighting and mood are
greatly impacted by cloud variations and the time of day they are captured. Once
you are satisfied, the real work is done and the fun begins! Now, let’s look at
how to deploy the Photomatix Pro software for photo manipulation on your
computer. This will allow you to quickly see the many exciting photo variations
you can now create with Photomatix Pro.
When you are ready with your computer
in front of you, follow these instructions. Go to the http://www.hdrsoft.com/ website and download
a free trial version of the Photomatix Pro software. You can find a link to do
this in the middle of the cover page. Again, I recommend that you first test
your results on a free version of the software in order to make sure you are
happy before spending money. The test version will allow you to see the results
achieved by merging your three variations before investing $99 for the full
software license. Test version photos will have a rather ugly watermark but
will still show you the full creativity and power of the software for your
approval.
After
you have loaded the test version of Photomatix Pro software onto your computer
you will also need to take your captured digital images from your camera and
place them into a file folder on the same computer. Now open the software and
notice that you will have a new workspace with a menu called Workflow
Shortcuts. Choose the selection called Load
Bracketed Photos and notice that it opens a new box called Loading Bracketed Files. Now click the Browse tab and proceed to the folder on
your computer that you created with your captured images. Once here, you will
want to select the three variations (-2EV, 0EV, +2EV) from the same photograph
composition. You can easily do this by holding Ctrl and clicking on the three consecutively numbered images. When
these three photos are selected, click Open.
This will place the three files you selected into the Loading Bracketed Files menu.
Now,
select the OK tab. This will open
another menu called Preprocessing Options
but just select the OK tab again for
simplicity in order to quickly see the standard options for your first
experience in HDR photography using Photomatix Pro. When you do this you will
see that the program begins to load the source images, exacts an alignment
process and merges the photos into an HDR image automatically. When this
process is complete you will have your first glimpse at your photograph in some
form of HDR image.
There
will be three main work portals that now come into view for the first time on
your HDR image. The largest of these portals is called the Preview window and it holds the results of your work. This is the
photo you are working on. Also, along the bottom of the work space there is a Preset Thumbnails window. You can change
your photo in the preview window by selecting a different preset in the Preset
Thumbnails window. Note that there are 12 options in the presets to select from
that will impact your photo in the Preview window. After selecting the
thumbnail you wish to begin with you can make slight alterations to that preset
by using the Adjustments window in the upper left. You will have hours of fun
perfecting your ideal photos with these tools or you can simply choose the
presets and turn them into incredible photographic art in just seconds.
When
you have completed the desired editing and the photo in the Preview window is satisfactory,
click the Process tab in the
Adjustments window. This will produce the desired image so that it can be saved
for your future enjoyment. Then you simply hit the File button in the upper left corner and select Save Image in the drop down menu. You
have your first HDR image to see in full screen detail. It will have a
watermark stamping imbedded into the photo until you purchase the software but
you will see and be able to evaluate if this is the kind of creative
photography that you would enjoy showing off to your viewers. After
familiarizing yourself with this tool you will learn to quickly create your own
presets and be able to explore many more powerful options buried in Photomatix
Pro. This program made my leap into HDR photography very simple and gave me
quick results while still allowing me to be creative and produce interesting
images for my photography website at www.nikonsniper.com.
Best
of luck in HDR!
NikonSniper
Steve


Subscribe to:
Posts (Atom)